Understanding the Concept2 Force Curve Graph
Written by Charissa Sutliff
I want to share some education about rowing technique and power output on the rowers. You know that screen on your rower that has the curvy graph? That is a force curve! For those of us who like nerding out over science, this is the force you are putting on the rower and the power you are generating. CrossFit is all about the POWAH. CrossFit benchmark workouts are designed to measure force and power.
Force = Mass X Acceleration
Power = Work / Time or Power = (Force x Distance) / Time
Power = Force x Distance/Time.
Force x Distance is equal to work, so power is also equal to work/time
Okay, enough of the nerdy stuff. More or less, the force curve graph is a helpful tool for improving your rowing technique.
The Concept2 Erg Force Curve
The force curve graphically represents how you apply force during the rowing stroke, indicating how your force varies as you use your legs, back and arms during the drive. The smoother the curve, the smoother the application of force. The larger the area under the curve, the greater the amount of force applied. Some of you might notice that your force curve is a little chunky. That’s okay! This is telling you where to look and what to work on. Rowing with the force curve is a great way to work on smoothing out your technique and stroke.
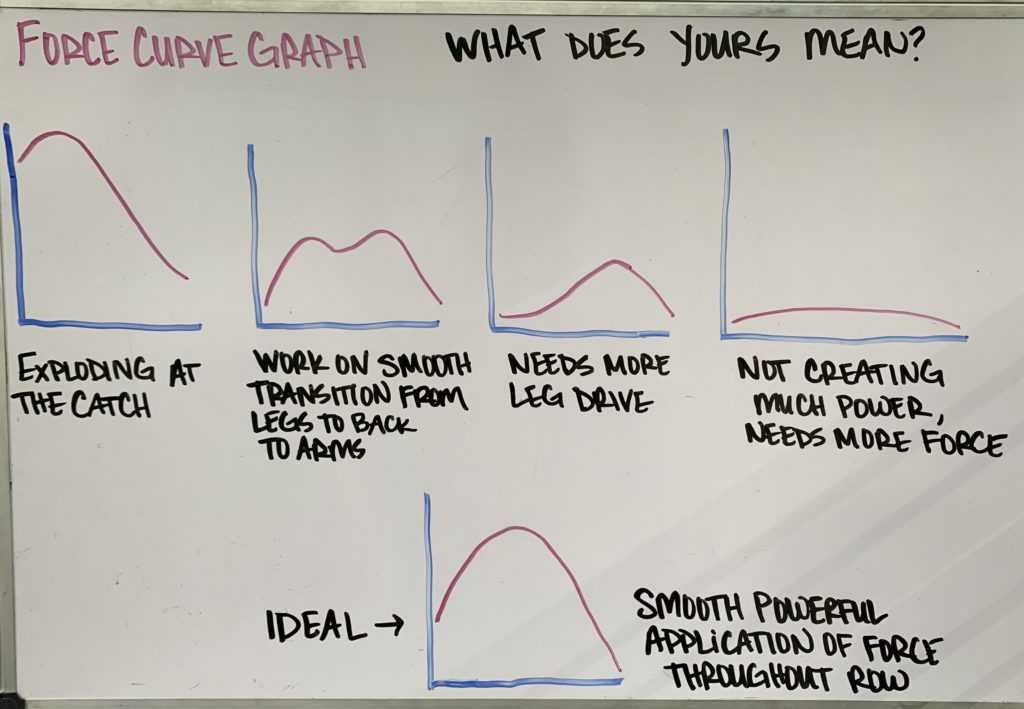
Chunky front end means this:
A huge peak on the front end of the curve that tapers off means you are likely applying too much force too early and should distribute it more through the rest of the stroke.
Chunky middle means this:
A dip in the middle, depending on where it is can mean two things. A peak that dips peaks again and drops off is usually an issue in connection between legs, hips and arms. We would be looking at a disconnection somewhere in the transitionary period in the middle.
Chunky back end means this:
A dip or deviation at the back end of the curve can either be a problem connecting the hips to the arms or a problem with the arms.
Long flatline means this:
There isn’t much power or area under the curve. You are not creating much force or are not able to apply much force to the machine. We should be working on how you connect, on better bracing at the catch, better application of force into the machine, and better positioning.
Going forward, use this screen to check on the efficiency of your row technique and use it to help you improve the timing of the drive, transition and catch of your row. Ideally we want our rowing to be smooth as a knife in butter from the catch, through drive and pull to the catch.
Force Curve + 500m Split Screen
Using the force curve display is one setting that can improve your technique, another is the 500m split time. This is helpful because you can visually and graphically see how efficient your row technique is as well as you can see that through having an efficient technique and application of force throughout the different phases of the row your 500m split time will be faster. Fast is not fast. Smooth is fast.
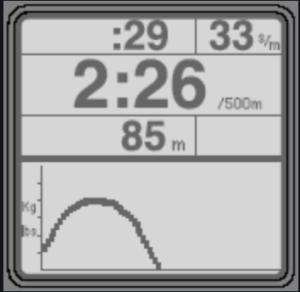
You can view these at the same time. To navigate to see both the force curve and the 500m split time:
1. Start Rowing On The Machine To Turn On
2. Press Change Units Button On Your Monitor To Display Power Curve Option
3. Press Change Units Button On Your Monitor To 500 Split Time Average
At the end of the day we want consistent, smooth, large areas under the curve. To get that we want to properly sequence the use of the legs, hips, then arms, and return them in sequined fashion in reverse order.
The most ideal and common force curve would have a high peak in the middle with lots of area under the curve. The sequenced style of rowing with a high peak and large amount of area under the curve is the most common style of rowing among rowers.
How to Smooth Out Your Force Curve
Try this exercise:
Set your damper on a 1, row between a 25-30 stroke rate, use the force curve display and try to create consistent smooth curves that all look the same for 10 minutes. Training with the rower on 1 is like training with a PVC pipe to practice the Olympic weightlifting movements with good technique. You will find that you have to be really intentional and use your legs and time your transitions effectively with the damper at 1. Practice makes a habit!
Posture > Positions > Sequencing > then Power!
Rowing Posture
Think tight, strong, midline, pillar, cylinder, or torso. There is a difference between just going through the motions and actively engaging your body, musculature and posture for rowing
Rowing Positions
The Catch
- Arms are straight; head is neutral; shoulders are level and not hunched.
- Upper body is leaning forward from the hips with the shoulders
in front of the hips. - Shins are vertical, or as close to vertical as is comfortable for you. Shins should not move beyond perpendicular.
- Heels may lift as needed.
The Drive
- Start the drive by pressing with your legs, and then swing the back through the vertical position before finally adding the arm pull.
- Hands move in a straight line to and from the flywheel.
- Shoulders remain low and relaxed.
The Finish
- Upper body is leaning back slightly, using good support from
the core muscles. - Legs are extended and the handle is held lightly below your ribs.
- Shoulders should be low with wrists and grip relaxed. Wrists should be flat.
The Recovery
- Extend your arms until they straighten before leaning from the hips towards the flywheel.
- Once your hands have cleared your knees, allow your knees to bend and gradually slide the seat forward on the monorail.
Rowing Sequencing
Drive OUT with the legs, swing the hips/open the hips/torso leans back slightly, then arms. The row is a PUSH not a pull. If you have deadlifted before, it’s like a deadlift, with a high pull. We drive or push the machine away, drive out with our legs, then transition force into hips (hip extension) then through the torso, and into the arms. Then we reverse it, arms go away, hips close, knees bend and we get the handles back toward the flywheel in a nice compressed catch.
The rower is an awesome machine! Improving your row is a combination of proper posture, good positions, efficient application and transfer of force throughout the row. We might look at a Concept2 row erg and think oh, easy however there are little things we can work on to improve our rowing.
Also Check Out…